I’ve just updated the Marlin firmware on my Sumpod 3d printer since I’m always keen to have the latest features and bug fixes. To be honest, I don’t mess with the firmware that much, and if it wasn’t for the configuration file from my last version, I would struggle to remember what sort of configuration I would need to set in the latest firmware version.
Anyway, while my latest experience with 3d printer firmware is still fresh in the mined, I’ll share some notes about what settings you need to know to get a basic Marlin firmware configured enough to get a 3d printer working. The notes will focus on the Marlin firmware v1 and will include setting up a click encoder and LCD panel. But before going straight into getting the Marlin firmware configured, I’ll first quickly introduce you to a handy tool called WinMerge.
UPDATE Sep 10, 2013
While the latest Marlin firmware continues to be developed, with many new features being added all the time, I’ve decided to maintain a snapshot of the firmware that this guide is based on. Using this guide with the firmware it is based on will give you the smoothest 3d printer set-up experience.
To download the firmware, click on the “Download ZIP” button located at the bottom of the right column on the GitHub page.
https://github.com/Airtripper/marlin_01
WinMerge
For anybody that’s in the business of editing and configuring 3d printer firmware files such as the Marlin firmware, I would suggest downloading a copy of WinMerge. It’s free, open source software, and is cross platform, so the same tool will run on Windows and Linux.
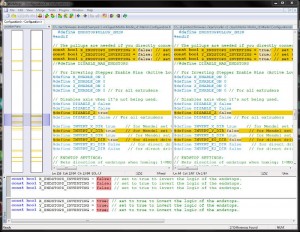
You can use WinMerge to compare a clean version of your Marlin firmware against your edited version that you are using on your 3d printer. This will help to keep track and note all the changes made to the files that you might want to transfer to a newer firmware version.
You can open just two files to compare or you can open two folders to compare. Comparing 3d printer firmware folders will allow you to quickly spot which files that have been edited.
Marlin Firmware Basic Configuration
Some motherboards listed in the Marlin firmware configuration file may not have support for some of the options or features available to configure. The notes will be biased towards the Ramps 1.3 board, but the note will still be valid for any Marlin firmware compatible board.
This Marlin firmware will be useful to those who wish to configure their own 3d printer firmware and want information that expands on the comments already made in the Marlin firmware. The notes are a brief guide on what the settings are and how to use them, leaving it up to the person who is configuring the 3d printer to decide what the final settings should be. I don’t guarantee that the information in this Marlin firmware guide is accurate, however, if you spot any mistakes please leave a comment at the end of the post. The Marlin firmware guide is likely to be updated to improve the information where necessary after publishing.
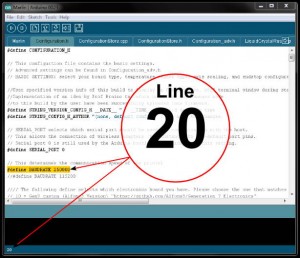
For Marlin Firmware V1 you will need Arduino 0023 IDE to save, compile and upload to the 3d printer motherboard. In the following notes, to edit the firmware, I’ll be using line numbers to reference the location of the code in the Marlin firmware configuration file. Although there is no line numbering in the IDE editor window, you will see the line number at the bottom left of the IDE showing the current cursor position. Just move the cursor to any line with the mouse to update the line number.
To get the 3d printer up and running you only need to configure one file in the Marlin firmware and that file is the Configuration.h
Marlin firmware Configuration
So, to get started, open up the Marlin firmware Configuration.h in the Arduino IDE and work down the notes below. Use WinMerge to compare the changes to a clean non-edited version of Configuration.h for final review before uploading to the 3d printer motherboard.
Baud Rate – line 20
#define BAUDRATE 250000
//#define BAUDRATE 115200
Line 20 marks the start of the Marlin firmware configuration journey and this is where the baud rate is set to determine the speed of the communication between the printer interface software and the Marlin firmware. Two common baud rate options are defined with one, preceded with two forward slashes (//), commented out to disable. The default enabled option, 250000 baud rate, works well when used with Printrun/Pronterface and RepSnapper software.
Motherboard – line 49
#ifndef MOTHERBOARD
#define MOTHERBOARD 33
#endif
You will see a list of motherboards to choose from preceding the code snippet shown above in the Marlin firmware configuration file. The code snippet above defines the Ramps 1.3 as the motherboard, you can select a board just by changing the number to any board that’s on the list. The Marlin firmware will manage circuit board pin assignments to match the motherboard you have selected. Pin assignment details for each motherboard type can be found in the pins.h file of the Marlin firmware.
Marlin Firmware Thermal Settings
Now we come to the thermal settings section of the Marlin firmware where things get a bit more complicated, however, we don’t need to touch the complicated stuff to get the printer up and running. Basically all we need to do is select a temperature sensor type for each of the sensors installed on the 3d printer. If you did not install the temperature sensors yourself, you may have to investigate what sensors you do have so that you can select the best match from the list. More about thermistors on the RepRap wiki.
Thermistor – line 78
#define TEMP_SENSOR_0 1
#define TEMP_SENSOR_1 0
#define TEMP_SENSOR_2 0
#define TEMP_SENSOR_BED 1
If you are looking at the Marlin firmware configuration file you will see a list of temperature sensor types preceding the code snippet shown above. The code snippet above is setting up the 3d printer that features one hot end and a heated build platform. The temperature sensor selected for both features is 100k thermistor.
If you are using the Ramps 1.3 motherboard with the default pin.h file in the Marlin firmware, the motherboard connectors T0 and T1 will be enabled for the hot end sensor and the heated bed sensor. Changing the 1 to a 0 will disable that sensor. Change the number to select the best match for your sensor from the list.
Maximum Temperatures – line 99
#define HEATER_0_MAXTEMP 275
#define HEATER_1_MAXTEMP 275
#define HEATER_2_MAXTEMP 275
#define BED_MAXTEMP 120
Some hot ends and heated build platforms might have a maximum temperature rating much less than the default settings in the Marlin firmware, reducing the default maximum temperatures will help avoid accidental damage to the 3d printer if set too high in the interface software.
Marlin firmware Mechanical Settings
The Marlin firmware Mechanical Settings section will be about configuring End Stops, Stepper Motors, Build Platform Printable area and Steps Per Unit.
End Stops & Pull Ups
This section will be about configuring end stops in the Marlin firmware that are the limit switches for each axis on the 3d printer. Issuing a homing command from the interface software will cause the 3d printer to mechanically move each axis towards the end stop until the limit switch is triggered. ENDSTOPPULLUPS will need to be defined where you have limit switches that don’t supply a voltage to the signal pin to generate a digital 1. Enabling pull up resistors will ensure that the end stop signal line will read a digital 1, and when the signal line is shorted to ground by the limit switch, you get a digital 0.
For more information about end stops please refer to the RepRap wiki for Mechanical Endstop, OptoEndstop 2.1 and Gen7 Endstop 1.3.1.
Coarse End Stop Pull Up Resistor – line 194
// corse Endstop Settings
#define ENDSTOPPULLUPS // Comment this out (using // at the start of the line) to disable the endstop pullup resistors
In the Marlin firmware ENDSTOPPULLUPS is defined by default, and ENDSTOPPULLUPS for each end stop connector on the motherboard are enabled individually from line 207. However, commenting out line 194 will only disable ENDSTOPPULLUPS that are also commented out optionally for each connector from line 197. Having this kind of fine tuning makes it easier to configure different types of end stops connected to the 3d printer. You may have mechanical end stop switches for axis X and Y that need pull up resistors enabled and optical end stops that don’t need pull up resistors enabled.
Fine End Stop Pull Up Resistor – line 196
#ifndef ENDSTOPPULLUPS
// fine Enstop settings: Individual Pullups. will be ignord if ENDSTOPPULLUPS is defined
#define ENDSTOPPULLUP_XMAX
#define ENDSTOPPULLUP_YMAX
#define ENDSTOPPULLUP_ZMAX
#define ENDSTOPPULLUP_XMIN
#define ENDSTOPPULLUP_YMIN
//#define ENDSTOPPULLUP_ZMIN
#endif
If ENDSTOPPULLUPS at line 194 in the Configuration.h file of the Marlin firmware is commented out, then the code snippet above, starting at line 196, will execute. This code snippet will allow you to configure individual pull ups for each end stop connector on the motherboard. You would comment out a define statement for an end stop where you don’t need a pull up by preceding the line with two forward slashes. You would normally need to enable pull ups when using mechanical end stop type switches that just simply sink the signal pin to ground on the motherboard end stop connector.
Inverting End Stops – line 216
// The pullups are needed if you directly connect a mechanical endswitch between the signal and ground pins.
// set to true to invert the logic of the endstops.
const bool X_ENDSTOPS_INVERTING = false;
const bool Y_ENDSTOPS_INVERTING = false;
const bool Z_ENDSTOPS_INVERTING = false;
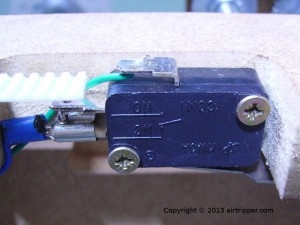
For a mechanical end stop that is wired as normally connected (NC), a digital signal of 1 will be read when an axis is in contact with the limit switch. In this case End stop inverting needs to be false. End stop inverting needs to be true if the mechanical end stop is wired as normally open (NO).
For optical end stops, you will need to refer to the suppliers specification or a previous configuration.h file like the one in the Marlin firmware.
You should test the homing command while the axis is positioned at the centre of the travel distance. If you find that the axis won’t move when the home command is sent, then you may have the logic incorrectly configured. Be ready to reset the motherboard or turn off the power to avoid axis crash. Before making any test, complete the Marlin firmware configuration as much as possible. If you can reach the end stops easily, you can trigger them early before the axis has completed it’s travel for a safe test.
Disable Maximum End Stops – line 219
//#define DISABLE_MAX_ENDSTOPS
The above code snippet found on line 219 of the Marlin firmware Configuration.h file is commented out by default, which allows homing axis to end stops where end stop switches are connected to the X+, Y+ and Z+ connectors on the motherboard.
It is common to have the Z axis end stop switch connected to the Z+ connector in order to home the Z axis away from the hot end. In order to do this, line 219 needs to be commented out. Line 219 may behave differently for boards that don’t have X+, Y+ & Z+ end stop connectors.
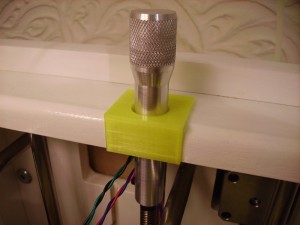
Disable Z axis = true in the Marlin firmware configuration if you want to operate a Z axis handle during 3d printing
Disable Axis – line 228
// Disables axis when it’s not being used.
#define DISABLE_X false
#define DISABLE_Y false
#define DISABLE_Z true
#define DISABLE_E false // For all extruders
Normally the above code snippet would not be changed in the Marlin firmware and all the settings would be set to false by default. However, if your 3d printer has a Z axis handle fitted like my 3d printer you might want to disable the Z axis so that the stepper motor can be turned by the Z axis handle while the 3d printer is printing. I’ve often made a Z height adjustment to fine tune the gap between the nozzle and the build bed as the first layer begins to print.
Stepper Motors
We have reached the part in the Marlin firmware configuration file where you configure stepper motor rotation direction, end stop direction, travel limits and steps per unit. As long as the end stops are configured correctly, the following settings should be easy enough to sort out during testing.
Stepper Motor Rotation direction – line 233
#define INVERT_X_DIR true
#define INVERT_Y_DIR true
#define INVERT_Z_DIR true
#define INVERT_E0_DIR true
#define INVERT_E1_DIR false
#define INVERT_E2_DIR false
This is where we decide which direction each axis will go when we control the 3d printer through the interface software. When we send a command to move +10mm on an axis, we expect the axis to move 10mm in the direction expected. The initial stepper motor direction can be difficult to predict without switching on the printer and performing a test. So I would suggest leaving these settings till last and complete the rest of the Marlin firmware configuration before proceeding with the test.
Once the Marlin firmware Configuration file is configured enough to operate the 3d printer, you can perform a test to check that each axis move in the correct direction. Set each axis midpoint of their full travel distance and then switch on the printer. After connecting to the 3d printer through the interface software such as Printrun/pronterface, test each axis by jogging them 10mm in the positive direction. The stepper motor rotation direction for each axis can be corrected from line 233 in the Marlin firmware configuration by changing the logic.
You would need to test the extruder stepper motor direction as well. This can be done without filament loaded and bringing the hot end temperature up to 175 degrees so the Marlin firmware will allow extrusion. Send an extrude command through the 3d printer interface software and observe the direction the filament drive gear pulley rotation. The rotation direction for the extruder can be corrected from line 236 by changing the logic.
When performing axis homing and axis jogging for the first time, it is important to be ready to press the reset button or be ready to turn off the power to avoid axis crashing. Home each axis separately to confirm that the axis is homing towards the end stop. If you can reach the end stops easily, you can trigger them early before the axis has completed it’s travel for a safe test.
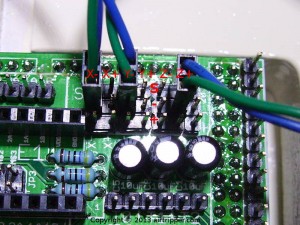
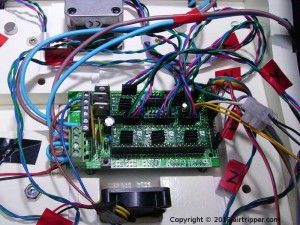
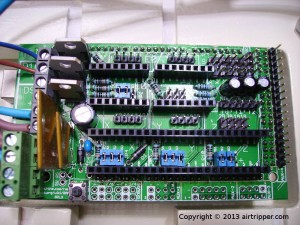
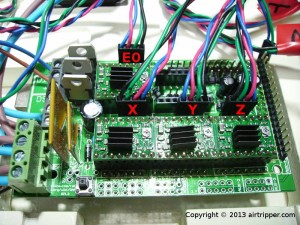
RAMPS 1.3 Mechanical End Stop Connections X-, Y- & Z+. These should also match End Stop home direction.
End Stop Home Direction – line 242
// Sets direction of endstops when homing; 1=MAX, -1=MIN
#define X_HOME_DIR -1
#define Y_HOME_DIR -1
#define Z_HOME_DIR 1
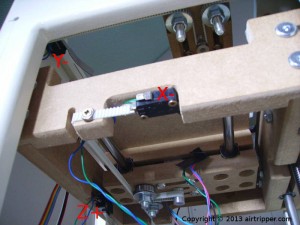
Basically you tell the Marlin firmware which end of the axis the end stop switch is located. It is common for X and Y axis to home the hot end to the Zero location and Z axis end stop home to the maximum positive location. The code snippet above and the image to the right shows that configuration.
Some motherboards like the Ramps 1.3 have a connector for each end of each axis, totalling six connectors. You will need to be sure that the settings above match the end stop connections to the motherboard.
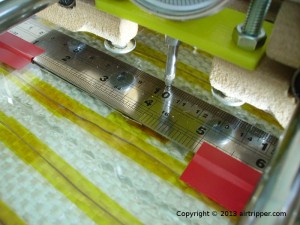
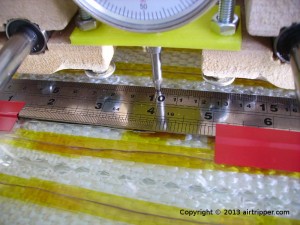
Measuring Travel limits for Marlin Firmware Configuration. Using a Dial Indicator Can Make it easier to see the measurements.
Travel Limits – line 249
#define X_MAX_POS 130
#define X_MIN_POS 0
#define Y_MAX_POS 130
#define Y_MIN_POS 0
#define Z_MAX_POS 107
#define Z_MIN_POS 0
The above defines the printable area of the 3d printer after homing. For the X and Y axis you just measure the travel length of the nozzle from the home position. The maximum travel length will either be restricted by the size of the build platform or by the maximum travel distance of the axis.
When setting up the Z axis for the first time, it is best to set the Z axis travel length a bit shorter than what is measured until a software and hardware test of the 3d printer is completed. This will help to avoid accidentally crashing the build bed into the hot end during initial tests. The Z axis travel length can be fine tuned later after the tests have been satisfied.
The measurement units are in millimeters and are defined from line 249 for the maximum positions in the Marlin firmware configuration file. The minimum positions can be left at the default 0 for this configuration.
Steps Per Unit – line 275
#define DEFAULT_AXIS_STEPS_PER_UNIT {106.76, 106.76, 800, 48.14}
Configuring steps per unit will be one of the last bits of fine tuning you do before you start printing for the first time. Calculating steps per unit accurately will give the 3d printed parts the best start possible. However, if you are just upgrading the Marlin firmware or upgrading from any other firmware, you can get the steps per unit figures from the old configuration file if you still have it.
Steps per unit means the number of steps a stepper motor has to turn to equal 1mm of axis travel. The units at line 275 of the Marlin firmware configuration.h file are in the order of X, Y, Z and E. Getting the steps per unit from another printer of the same design would be very close to what you need, and will help you run some stepper motor tests before you get down to calculating accurate steps per unit for the Marlin firmware configuration file.
The code snippet above shows the steps per unit for my Sumpod 3d printer and is not the default setting in the Marlin firmware configuration.
Steps Per Unit Calculation
To calculate steps per unit (mm) to put in the Marlin firmware configuration file, you need to find a good way to measure axis travel distance accurately. You may have to temporary remove the hot end so that the filament can be extruded in order to make measurements. Using a dial indicator in place of the hot end and a ruler taped to the bed can provide a good accurate way to measured travelled distance. To get the best accuracy you should sample at least 100mm of axis travel. You command the printer to move the chosen axis 100mm using an interface software such as Pronterface. You then measure the actual distance the the axis travelled. Using the formula below you can calculate the new steps per unit.
Steps Per Unit Formula
NewStepsPerUnit = SampleTravelDist / ActualTravelDist x OldStepsPerUnit
You then repeat the above formula as many times as necessary until the commanded travel distance matches the actual distance travelled, using the NewStepsPerUnit as the OldStepsPerUnit each time.
Marlin Firmware Basic Configuration – The End
At this point, you have done enough configuration in the Marlin firmware and can now start 3d printing. If you are interested in LCD display and click encoders, read on.
Marlin Firmware additional Features
The last section in the Marlin firmware configuration file is for additional features, this section allows you to configure some of the optional extras you might have attached to your 3d printer. For the purpose of this guide I’m just going to include notes for the LCD 16×2 and the LCD 20×4 with click encoder control panel. The RAMPS 1.3 Arduino shield and my Marlin firmware configuration will be used for this guide.
Enabling an attached 16×2 LCD or click encoder control panel is straight forward in the Marlin firmware. However, the pin assignments for the attachment connectors need to match those in the Marlin firmware pins.h file. You can check if the LCD and click encoder panel features are supported for your motherboard by looking through the the pins.h file of the Marlin firmware. If you are just updating the Marlin firmware you can check for pin assignment changes by comparing your old pins.h configuration file with the new version of that file. Any changes found can be used to update the latest version of the Marlin firmware.
Adding LCD Support – line 303
#define ULTRA_LCD
To enable any type of LCD support in the Marlin firmware, ULTRA_LCD needs to be defined. To add support for 16×2 LCD display, line 303 needs to be uncommented like the code snippet above, by removing the preceding forward slashes. By default, the Marlin firmware does not have LCD or click encoder control panel enabled. Enabling line 303 and nothing else will give you support for 16×2 LCD screen that is connected to the motherboard pins as assigned in the pins.h file. Pin assignments are found in the pins.h file of the Marlin firmware under each supported motherboard type.
Adding Click Encoder Support
There are two popular types of click encoder control panels that can be enabled for the RAMPS 1.3 board. The first type is the Ultipanel, which can be found on Thingiverse, and the other type is the RepRapDiscount Smart Controller. For this guide I’m just going add notes for the Ultipanel since the other type is supported by RepRapDiscount RepRap wiki for the Marlin firmware.
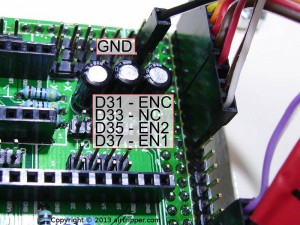
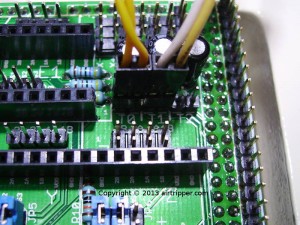
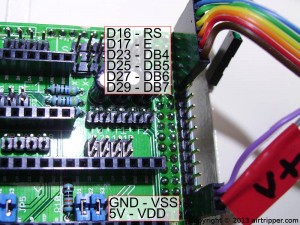
RAMPS 1.3 Click Encoder Pin Connections – Marlin Firmware Default Pin Assignment For This Board & Ultipanel.
Enabling ULTIPANEL – line 307
#define ULTIPANEL
Enabling NEWPANEL – line 331
#define NEWPANEL
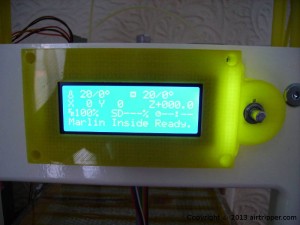
Both lines 307 and 331 are not enabled by default. To enable 20×4 LCD display and click encoder, uncomment both lines by removing the forward slashes. This would also enable SD Card support as well, a feature that will be covered in another guide. It will not be necessary to uncomment line 303 if line 307 is enabled by uncommenting. ULTRA_LCD will automatically be defined when ULTIPANEL is defined.
Marlin Firmware Guide – The End
Well that concludes the Marlin firmware guide for now, and I would expect to be making updates going forward to correct errors if any are found or just to improve certain aspects of the guide.
[bodyadsrich1l]
If you have any questions or comments about the Marlin firmware guide, please leave them below. However, if you need Marlin firmware support, this is perhaps not the best place to get it.

Wow. This is a fantastically organized and crystal clear post. Thank you so much, it’s helped tremendously for me!
hi there mark,
Thnks for the guide, one q thou, i need to use a RAMPS 1.4 to print with a TOM hardware.
i just have trouble make the Z axis and/or the gcode with slic3r be the correct one, x, y, and e, seems to work fine, but Z keeps struck at the Z home position, on the gcode it only move .325 on the firs Z position, i dont get to Z goes all the way down to the hot bed and print where it supposed to.
As the TOM used to work with its old firmware, first it need to be centered the axis, xyz, then run a calibration scrip, generate the gcode and then the z axis came from the top, positioning just right above the hot bed and print.
i think i might have something wrong with aligning to the center/homing/calibrating.
Hope u could help.
Regards
It could be that the firmware configuration is not correct for the Z end stop on your printer.
Your printer Z axis may not be moving to the bed to print because according to the firmware your printer Z axis is already at 0 (Z_MIN).
If your Z axis should home away from the bed then the firmware needs to be set to home the Z axis to Z_MAX. This is done by the following code at about line 244:
#define Z_HOME_DIR 1
Also, the Z endstop needs to be connected to the +Z connector on the RAMPS 1.4.
If your Z axis does indeed home away from the bed you must make sure the Z_MAX_POS travel measurement between the nozzle and the bed is correct to avoid crashing.
If the above did not help, send me your Marlin configuration.h file to airtripper2010@gmail.com to check if it is consistent with your hardware set up.
Mark
Dear Mark
Appreciate the response let me try this things and get back to you, thanks
Hi Mark,
The guide is very useful. I’m trying to use a Ramps 1.4 with Ultipanel and a dual extruder but it doesn’t work neither with a single extruder. It seems that the click/encoder it’s wrong configurated because the LCD it’s continuously changing between the main interface and the main menu.
I check the pins with the previous firmware (the marlin not v1) and they are the same. What do you think? I don’t know what I can do.
Thanks for all.
Martin.
Hi Martin,
It looks like you might have the click encoders wires mixed up. Your Marlin firmware thinks you are holding down the click button and that’s why the menu on the LCD Screen changes back and forth. You may have a click encoder rotary wire connected where the click button wire should go. The pictures above show the configuration for the ULTIPANEL definition.
There are two click encoder pin configurations, one for ULTIPANEL and one for REPRAP_DISCOUNT_SMART_CONTROLLER. If you purchased the LCD and click encoder as a kit then it might be wired for REPRAP_DISCOUNT_SMART_CONTROLLER configuration. This means you will have to #define REPRAP_DISCOUNT_SMART_CONTROLLER instead of #define ULTIPANEL in the Marlin configuration.h file.
The wiring looks very similar for both ULTIPANEL and REPRAP_DISCOUNT_SMART_CONTROLLER and setting the wrong definition in firmware could cause the symptoms you described on the LCD Screen.
You could just keep the firmware as it is and just correct the wires on the click encoder.
Mark
Hi again Mark,
It was that, thanks you so much for your help. I confuse the both LCD’s.
Regards.
Martin.
Hello,
I have a question above a LCD shield.
This is a link:
http://linksprite.com/wiki/index.php5?title=16_X_2_LCD_Keypad_Shield_for_Arduino
It is posible to conectied to ramps 1.4 How will I modify firmware?
I use firmware marliv V1 for deltabot.
Thanks for the answer
There is no advantage to using this shield since the button arrangement is not compatible with the firmware. Also the shield does not provide easy connection to the RAMPS motherboard; so you may as well just use a bare LCD and a click encoder.
The shield keypad button press is detected using an analogue to digital converter on the Arduino which is a method I don’t think is supported by the firmware.
Mark
Hi Mark
first to thank you for such a useful guide.
Please dont mind me for keeping some of info secret at this stage but i am
in a middle of building something in the 3d printing area.
Most of the cad drawings are finished and we a re sourcing parts at the moment.
I thought if you are available to help me out with few things when it comes to the programing part of it and the capability of the arduino mega 2560 with ramps 1.4.
if you can please email me to dejan35@tpg.com.au and we will take it from there.
cheers
dean
Hi, first of all I want to say this is a great document.
Say I want to develop something over marlin, and I don’t want to complie & copy it every time to my 3d printer, so Im asking if there is any way to simulate it? how are people developing it?
Hi,
Thank you.
I regularly use just the compile option to keep errors in check, and run and test the new code on it’s own, while possible, before adding it to the main code.
After a quick search on google I found this simulator:
http://www.virtronics.com.au/Simulator-for-Arduino.html
The Marlin firmware could be too large and complex to work with this simulator, or the simulator could become unstable.
Mark
Hi Mark
many thanks for taking the time to compile such an intuitive “how to” for the marlin firmware. Your blog is the first I have found that details the ramps 1.3 board, which is what I have used for a Reprap Prusa i2 build with an arduino mega 2560. I have managed to test the electronics and motors and thermal elements using sprinter firmware and repetier host software to confirm they all work “to some degree”, (motors only judder as if not knowing to go one way or the other).
After finding your blog I immediately uploaded the marlin firmware and before any muddling with the configuration, I went through the same tests as before and unfortunately got the same results.
Below is some command logs from pronterface I am getting after working through the firmware configuration, clearly I have done something wrong as I now have no response at all from the motors. Any advice or help with this would be greatly appreciated.
Wrong end stops configuration can effect the stepper motor operation, apart from that, the faults are most likely down to hardware.
Follow the pre-flight check to set the stepper drivers here:
http://reprap.org/wiki/RAMPS_1.3#Pre-Flight_Check
Work on getting one stepper operating after double checking the end stop switch wires and end stop configuration.
Mark
Thanks Mark
I am almost 100% certain its down to the endstops possibly on two counts, the firmware configuration and wiring.
I am using mechanical switches already mounted on boards with three male header pins for molex connectors. I originally thought my problem was with having all three pins connected to the corresponding headers on the ramps board as pictured in the pre-flight check reprap wiki page.
I will follow your advice and concentrate on one motor first, and post an update on my progress and hopefully success.
Chris
Hi Mark,
I was upgrading for TFT 3.2″. My additional hardware in the Arduino Board is working separately, but when I am trying to integrate with Marlin software errors are coming. I have added all the header and C files but still showing my classes UTFT are missing. Please guide.
-Bakul
Hi Bakul,
Might be a bit beyond my scope here; not knowing the full details about your set-up.
Firstly, if not done so already, import the UTFT library using the Arduino IDE; under the Sketch menu. This method of adding the library might work better than just copy and pasting the library to the Arduino directory.
Secondly, are the classes missing because they are being called while out of scope?
Sorry I can’t be more help,
Mark
I am trying to configure marlin to be used to test the steppers in repetier or pronterface..Using a Rumba board… So far I have had no luck..about 50 errors relating to heat bed and extruder. Can you suggest a config… I have changed the motherboard to 80 and set extruders to 0 and heat bed to 0 see below:
Edited By Admin:17/12/13
Hi Bob,
The Marlin Firmware will halt if no thermistor is detected where it has been set, I’ve not tested it, but it may also halt by setting all the heat sensors to 0.
You could connect a thermistor that would normally be used for the hot end so that the Marlin firmware will allow you to run the tests. Then set the #define TEMP_SENSOR_0 0 to the thermistor type you have.
Marlin has some built in safety features that prevent actions when sensors are not detected or not installed.
Mark
Thanks a lot for the tutorial this has helped me a lot
Hi, nice and well done guide. I would like to ask if you can share some usefull links to other guides or some sort of manual to understand the Marlin firmware.
I would like to customize the Marlin for my RepStrap. Thanks, best for all.
Hi,
thanks for such great info on 3D printing. I’m new to the 3D printer world, and have built a Prusa I3 with Reprap Discount RAMPS 1.4 and Marlin. In fact, I downloaded your Marlin firmware as a starting point.
My printer works pretty well, and I have now started trying to use the 4×20 lcd panels SD card slot. I have a problem with the Z axis when printing from SD card. My prints come out dimensionally correct in both x and y axis, however the z axis height of prints is about 25% too small. I hooked up with the IRC channel and a guy there suggested the SD cards prints try to run at full speed settings as set in the firmware. I’m not sure if this is the case or how the firmware does this, as I thought that the gcode (generated by slic3r) defined the speed settings for the print. I used the same gcode for printing from pronterface from my MAC and from the SD card, with the height difference in z axis only evident from the SD card print.
I wondered if you have seen this quirk before and have any ideas what the problem might be?
Regards,
Graham
Graham,
It’s not a quirk I’ve seen before, but it’s strange that you get two different results with the same g-code.
To help pin point the problem, a test can be done where we can issue some instructions to the printer, then measure the output against what is expected.
;Z-TEST.GCO
G28 ;Home all axis
G1 Z0 ;Send Z axis to 0 Pos.
G1 Z50 ;Send Z axis to 50 Pos
The above G-code, saved in text file Z-TEST.GCO, is an example of a test you can do to check the travel distance of the Z axis after some motion. Load this file in Pronterface and run, then measure the distance between the bed and the Z axis, check the distance travelled against the g-code for a match. Run the same file from the SD card and check the distance as before. You can use Pronterface to upload the file to SD card, but run the file through the printer control interface.
You can choose a travel distance to test to match the width of a tablet box; or anything that will fit between the nozzle and bed to easily measure the distance travelled.
If there is a travel distance mismatch, run the same file a number of times in a row and check the distance travelled each time; we are looking for consistency between tests.
The next step of solving your problem will depend on the output of the above test.
Mark
Hi Mark,
I am building my first 3D printer, and I have ran into some troubles. I have built the printer, and have it wired to a RAMPS 1.4 with and arduino Mega 2560. I successfully flashed the marlin firmware onto the board. I then used repetier to control the printer. I went and tried to manually jog the axis to see how they worked, and that is where the problem lies. When I jog them 1mm, they turn a little bit, then start turning the opposite way, even though I am still jogging the same direction. When I try to jog them 10 or 100mm, the stepper motors make noise like they should turn, but they don’t turn at all. Any ideas what could be going on?
Thanks
Hello,
The homing of each axis is what you need to test first, Jogging will not work properly otherwise.
Home X, Y and Z separately first, checking that stepper motors are turning the correct rotation direction with the axis going towards the end stop. Set the axis at centre of travel before running the test to avoid an axis crash, be ready to cut power in case the axis goes the wrong direction.
Run through this Pre-flight check for good measure:
http://reprap.org/wiki/RAMPS_1.4#Pre-Flight_Check
Mark
Hi Mark,
Thanks for the reply. I was able to get them working properly. I forgot to attach the jumpers to the pins under the stepper drivers. I have a new problem though. I am using a servo motor and z probe with an endstop attached to it for a bed leveling system. When I hit print, the servo automatically starts jerking the whole time, kind of like twitching but not actually moving anywhere. It does this for the entire duration of the print. Any ideas what this could be?
Thanks,
Chris
Hello Chris,
Glad you got sorted, the jumpers are easy to miss since they’re hidden.
I’ve tried the auto bed levelling but abandoned it, not really needed for my type of 3d printer. I don’t think the servo implementation is very popular, using the hot end as the end stop seems to be better, especially with the delta type 3d printers.
According to the comment in the Marlin firmware code, the probe servo is only switched on during movement. So, why the servo is twitching, it’s a mystery to me for now. However, could a stepper motor nearby cause the twitching?
Mark
hey guys.I have a problem with testing stepper motors ,I can not start and demonstrate something with these (i.e control speed). I am using Arduino mega 2560 and Ramps 1.4 and polulu drivers A4988.I do not know how to improve the firmware for my stepper .Can somebody help me to start and control the stepper driver with these : arduino mega 2560 and Ramps 1.4 with polulu A4988 drivers.
Hello,
You will need to explain how far you have got with the firmware configuration, and have you connected to the firmware from the PC with software such as Pronterface or Cura. The firmware may not allow the stepper motors to run if there is no hot end temperature sensor connected. Also, the stepper motors will not operate properly if the end stops are not configured correctly.
It might take a few posts to get you sorted and it might be better to post your question on 3D Printing google group for faster response; link below.
https://plus.google.com/u/0/communities/117814474100552114108