The more improvements and new features added to the Sumpod 3d printer the more I want to use the 3d printer, and adding better filament handling has gone a long way to improve the 3d printer’s ease of use.
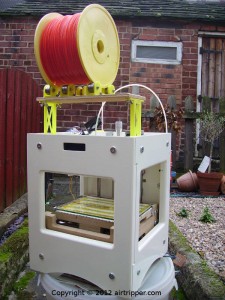
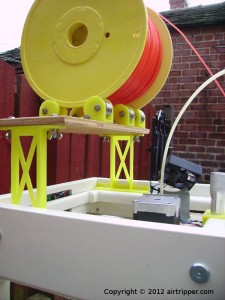
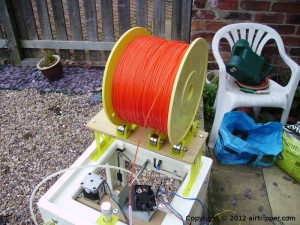
The Sumpod’s sturdy construction has allowed me to set up a filament spool rack on the top of the printer, and adding filament feed brackets to guide the filament round to the extruder keeps friction to a minimum during the printer’s operation. This set-up will go a long way to reduce the printer’s set-up and shutdown time because the filament spool can now be left at the printer.
I’ve made the design files available for download from thingiverse should anybody want to use them. The design files might not suit all Sumpod 3d printer configurations, but the designs should provide inspirations to those looking to improve their own filament material handling.
Sumpod 3D Printer outside – are you mad!
Well, to get the best clear pictures, I make the effort to get the Sumpod outside. I have to make sure it’s a dry day though because getting the MDF case damp might upset the printer’s build platform levelling :). I’ve got more features and improvements lined up for this printer so it looks like I’ll be taking it outside a few more times yet.
And the Problems Before – Basically, I had to put the filament spool where I could get it, and that was mostly on the floor in front of the printer. The spool got kicked over a few times due to lack of space and people walking past, and when done printing, I had to remove the filament from the printer and put away the spool until needed next time. I also had to turn the printer side ways facing so that the extruder was a bit more in line with the filament spool. Which made it difficult to check the LCD screen on the front of the printer.
The solution to these problems will allow me to keep the filament set-up on the printer and have a permanent place for the Airtripper’s pocket reel rollers. Having a spool rack on the Sumpod will allow the printer to stay loaded with filament reducing set up and shutdown times.
Sumpod 3D Printer Spool Rack & Guides
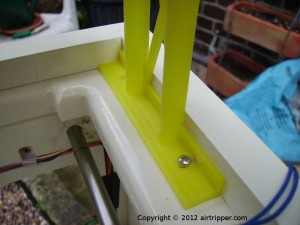
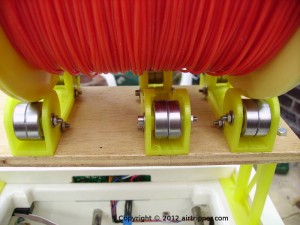
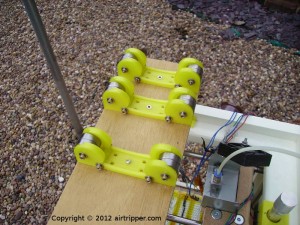
Spool Rack – The spool rack legs stand on the ridge just inside the top edge of the Sumpod’s outer casing, and anchored down with small screws. There is an option to have four screws to anchor but I’ve just used one in each leg here. Once the anchor screws are in place there is no need to remove them to take down the spool rack, just slacken off the screws a bit and move each leg inward to remove or to place.
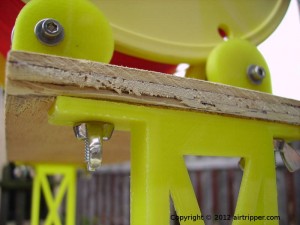
The spool rack shelf is just a scrap piece of 8.6mm ply measuring around 255mm by 100mm, basically the size to fit snugly inside the recess in the top of the Sumpod (after the legs are fitted), and the size to fit the Airtripper’s Pocket Reel Rollers. Having the spool rack stand inside the recess prevent sideways swagger, improving stability. M4 Wing nuts are used to attach the 100mm tall legs to the ply shelf which allows for easy and quick packing for transportation. Due to vibrations from the Sumpod during operation, it was necessary to fix the reel rollers to the shelf to avoid spools or reels toppling over the edge.
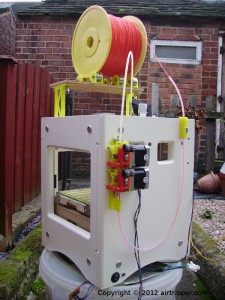
Filament Guide – Now that the 3d printer has a spool rack, I needed to set up a filament guide for the extruder driver on the back of the printer. The plan was to use existing fixtures to avoid drilling new holes or making new screw holes in back of the case, spoiling the paintwork.
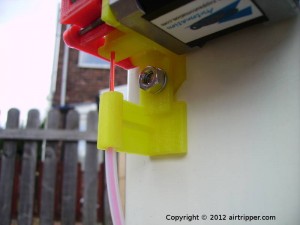
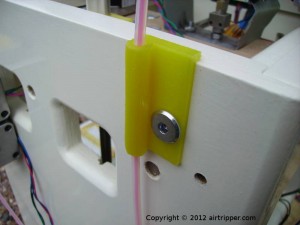
I suppose any tube that has very low friction properties will do for the filament guide, I used PTFE tube since I have plenty to spare. Tube brackets are in place to hold the PTFE tube in position to guide the filament round to the extruder from the spool. Without a guide, the filament is at risk of folding or breaking when pulled round sharp bends.
I designed two tube brackets, one to fit on to the Airtripper’s Bowden Extruder and one to fit a case fixing bolt on the top corner of the Sumpod 3d printer. The 4mm o.d. tube is in two pieces where one piece fits between the brackets while the other is used to guide the filament in to the first bracket I call the in-feed. The out-feed bracket is the one attached to the extruder driver.
Conclusion
The spool rack is working very well and it is wide enough to hold more than one filament spool. However, narrow spools are at risk of toppling if the printer is used in an area where it could get disturbed, like people bumping in to the table that the printer is on. For a more secure set up, a spool rack could be made using screw rods that attach to the spool’s hub, similar to whats already out there but made to sit on top of the Sumpod 3d printer.
I can’t guarantee that the spool rack is fit for purpose and regular checks may be necessary. If I had to print these again I would make the rack legs a bit thicker and more robust, and I would also add another 20mm to the height to give the Hot End bowden cable more headroom.
The Files
Get the files from here: thingiverse
[bodyadsrich1l]

Hi Mark,
I didn’t know any way to contact you, so I thought I’d leave a note here. I was wondering if you would be willing to help me get the last steps done on my Sumpod before I try to print something.
I was thinking maybe we could have a dialog on a new thread at reprap.org to leave something helpful to other noobs like myself.
Let me know.
THX
– k –
There is a thread already started in regard to Sumpods which is at:
http://forums.reprap.org/read.php?1,92952
Also, there is The Unofficial Sumpod Forum which I use, and it’s at:
http://sumpod.proboards.com/
I use both sites for information and support and likely to catch most Sumpod related postings on these sites. It will be good to get more Sumpod owners on these sites to share information and experiences, and also to collaborate on making the Sumpod better, especially on PCB routing, engraving and milling.
Thanks for the tip on Unofficial forum. I should have introduced myself, I am the guy on the reprap forum with the red, white and blue Sumpod. You complimented the finish.
I read through the Unofficial forum and got a bit more clarity. Also, read your blog post about leveling the bed. So, I got a dial indicator and, since I can’t print anything yet, hand built a mount to put it onto the X axis where the nozzle goes & took measurements around the bed
It appears that my Z axis table is tilted down significantly in the front. The front edge of the bed measures over 2mm lower than the rear edge. I’m guessing that’s not a good thing ;-o
I sent Richard a question, but wondered what you might think I did wrong. I’ve been sitting here for quite a while looking over everything, but feel really unsure about what to do to fix the problem.
I would really appreciate your thoughts
– kel –
You could use a glass or aluminium plate as the build platform and stick some Kapton or painters tape on it. It would look like the build platform on mine but without the heating components.
It will be difficult to correct the whole platform structure to within microns, so it is best to have an adjustable platform with easy access to the adjustment screws.
you’ll need to be carefull about putting screws in the MDF because it can split when putting in close to the edge.
With your platform I would just use 3 screws, 2 on one side and 1 screw on the other to balance the platform on. A adjusting the level is much easier with 3 screws than with 4 screws.
If the main platform is painted on the underside, you may get away with sticky taping the newly levelled platform in place. This will avoid making brackets and screwing them in to the main platform.
Once you get the printer working, you might be able to improve on this later.
I’m happy to help you out with this printer.
Mark
Mark,
thank you very much for your help and time! Taking your advice, I looked in my scrap aluminum box and found a 6mm plate that was 190mm x 170mm; a near direct replacement for the bed that came with the printer. Didn’t have to cut anything; Yay.
Next, I put the on my workbench and set the dial indicator to check it’s uniformity. Across the entire plate, I couldn’t get anything to register on the indicator, scale at 0.00mm so I think it’s a pretty good piece. Just to know, I put the supplied bed piece under the indicator, and it varies by up to 0.45mm in places.
Also, I got a reply from Richard and he’d put notes into one of the pictures I sent of my measuring setup, which clarified where I had gone wrong on assembly. So, I took the machine apart this afternoon and put the Z axis frame on the bench, loosened the bolts and squared it up. That made about a 75% improvement; from endstops set to 0.00, at max X and max Y it drops only 0.91mm.
I expect my improved bed plate added to the improvement, but I think I’m getting there.
Would you expand on the leveling screw installation? I’m having a hard time visualizing how that would work.
Going to power it up for the first time before I call it a day, and will let you know where I end up.
Again, my thanks!
– kel –
Ideally, you want to aim for a level that is better than 0.1mm in order to get a nice neat first layer when doing larger 3d prints. Your aluminium plate is ideal and by your test, It’s flatter than my piece of glass.
With the screws mentioned, these would be standard wood screws that you would screw in to the top of your platform. The screws would be positioned to form a tripod that would have the aluminium plate placed on top. For instance, the left edge of the aluminium plate is supported by a screw under each corner while the third screw is supporting the middle of the right edge.
To level the platform, you would slide the aluminium plate just enough to the side to reveal the screw head you want to adjust, starting with the two screws supporting the corners. You should level these two screws first before moving on to the third screw. The plate would need to be clamped down once the build platform is levelled.
You might consider drilling through the aluminium plate and then screw the plate down onto some springs onto the platform. You would not need clamps then to hold the plate in position, and if you countersink the screw holes, you can avoid the hot end nozzle crashing in to the screw heads. The screw heads are exposed and ready for adjustment in an instance. Having the build plate supported by springs will allow the bed to give way a bit if the hot end crashes in to it while doing Z axis manoeuvres.
If finding good springs is difficult, you could use rubber tube similar to what I use on the Airtripper’s bowden extruder.
It will be a good idea to drill pilot holes into the MDF for the screws, depending on the thickness of the screws being used.
I hope this helps a bit. I don’t know what level of experience you have as a craftsman, but if you need further help, I can provide a sketch easily enough and send you a link to it.
Mark
Mark, You are a genius for sure.
Since my last post, I looked over your heated-bed post and could see how you have the bed ‘pinched’ between screws and the aluminum side bracket.
Thinking along those lines, I conceived a complete platform replacement made in acrylic (one of my favorite mediums) that used screws and springs because I like the idea of being able to adjust the level ‘on-the-fly’. I may still build it later on, but your suggestion of screws through the aluminum bed and screws directly into the MDF could get the same result but MUCH simpler. I’m thinking of going completely through the MDF and using machine bolts. I have a bunch of 5mmX.7 I think would work well.
So, I’ll start the mods today and post an update when I finish.
I’d call myself advanced intermediate in the craftsman world. I’ve made lots of stuff, do my own car and house repairs, but only recently feel like I can compete in the building-stuff arena.
Thanks for kick-starting the brain!
– kel –
btw, i’m thinking about starting a new Sumpod thread on reprap for this kind of discussion. Do you think that would be useful? It seems like the ‘any feedback…’ thread is getting a bit cumbersome.
Starting a new Sumpod thread on reprap forums would not be an unusual thing to do, I’ve seen threads containing tens of thousands of comments.
If the Sumpod thread gets popular enough, a Sumpod forum may get created under Machine Variations on Reprap.org. I just wish the site was a bit more snappy though.
It will be good to get more Sumpod owners out in public to see what’s going on with their machines. It will be interesting know if people are using the Sumpod for anything other than just 3d printing. I’m going to attempt some PCB milling very soon, I’ve just got myself an engraving bit.
Mark
You know, I did notice that the reprap forum runs like a slug.
I was thinking that a Sumpod forum would be a better than just a thread, but I guess that will have to wait until more of us take the plunge.
I’ll be eager to hear your milling results. the CMC capability was one of the selling points for me. I’d like to do some simple engraving as well as PCB.
So, Good Luck with that.
Ok, here’s the update.
Looks like that did the trick. It’s not perfect, but I think I can at least try to print something and be well in the ballpark
At X & Y endstop, I set the dial indicator to 0.00mm. Moving X to max, it reads 0.01mm. X back at endstop and Y at max, it reads 0.07mm. Then moving X to max, it reads -0.15mm. At center of the bed it’s 0.01mm. That’s a lot better than the 2.20mm differences I started with.
So next is to load the firmware (marlin) and fire it up. Tomorrow (U.S. Mtn time) after work.
Since I can’t put pics in this reply, I’ll post them on my site when I get it back up. Hopefully sometime tomorrow. Update and link then.
Thanks for the inspiration!
– kel –
Poor bed levelling would have given you problems for sure.
Getting known issues sorted now will help trouble shoot those issues yet to come.
I’m finalising the documentation for the Airtripper’s Bowden Extruder V3. All the files are uploaded to Thingiverse waiting to go live. Everything should be public tomorrow.
Mark
One more update:
I could see that the worst variation was at X & Y max and I realized that I should have measured where the triangle apex went on the right side instead of just eyeballing it. I ended up with it a bit off center and that made Y max low and Y min high.
So, I made a small shim to put under the Y max corner, readjusted and got the entire bed level so that the maximum variation is 0.04mm.
Next, I’ll see how that works.
– k –
Looks like your levelling is going very well, Your 3d prints should get a good start with a nice even bond on the build platform.
I guess all that remains is getting the Sumpod 3d printer calibrated and the firmware set up.
If you are using RELEASE CANDIDATE 2 FOR MARLIN 1.0.0 I can help with the settings you might have missed. I would recommend using the latest Marlin From https://github.com/ErikZalm/Marlin/ there is very little you need to do in it to set it up for the Sumpod, and you’ll have an easy upgrade path to the newest versions as they are released.
I’ve added comments to your other posts in case you missed them.
Mark
Hi again,
So now that I have sufficiently struggled with the level of the bed, the gods of the 3rd dimension want me to struggle with the firmware.
After, literally, hours of struggle, I need help. I tried the firmware you suggested, and when I connect with Pronterface, it can’t see the thermistor and shuts everything down.
Using a version that is supposed to be Sumpod specific (written by “strohn”), it sees the thermistor, and when I click Heater: Set, the red LED – LED2 – comes on, but no heat. If I click Heater: Off, the LED goes off and I can switch it back and forth but that’s the only hint of life in this thing.
No heat, no motors, nothing.
So, I put my soldering iron against the heater, and Pronterface reports the increase in temperature. I put an external power supply on the heating element, and it heats up; and, again, Pronterface reports the changes.
I’ve tried Sprinter and a couple of other version of Marlin with no better results. I tried the RAMPS 1.4 test code I found on the reprap forum, and all it does is flash the red and green LEDs – LED1 and LED2. There is absolutely no life in the motors…not even a faint hum.
I am stumped.
– kel –
For Marlin to work for the Sumpod, some configuration needs to be done. I guess strohn’s version will be good to get you started. I’ll go through the details of setting up Marlin when I publish the click encoder control panel project.
Once you get to know the electronics a bit better, the firmware configuration files will begin to make more sense.
I’ve read your next post and see you’ve already solved the power issue.
Mark
Ok…Imadope,
I spent an hour or so reading posts on the reprap forum and something I read sparked an idea. I changed the block I had the 12v supply screwed into and it came to life. It was in the 11A input and should have been in 5A. Live and learn…
Now, I have the heater/control, motors and endstops working. Next to start on calibration. …but tomorrow…my brain hurts now.
– kel –
The Sumpod 3d printer electronics, motors, end stops and software are basically Reprap origin so I use the Reprap wiki a lot to help solve issues by understanding how the bits are connected together. The Reprap wiki was all I had to get the Sumpod 3d printer working correctly after building it.
I spent a lot of time studying the Ramps schematic before I was brave enough to connect the heated build platform I built.
I hope your calibration goes well.
I would try small manoeuvres first before attempting to home axis just to make sure the axis are going in the direction as expected. This will avoid unexpected crashes. If you need to flip round the stepper motor connector to change rotation direction, cut the power to the Sumpod 3d printer first.
Check out the pre-flight check on this wiki page before you start the calibration
http://reprap.org/wiki/RAMPS_1.4#Pre-Flight_Check
Mark
Hi,
Well, progress…sort of. I had been through the pre-flight check you recommended, so I dove right into calibration.
I used my dial indicator, and a video tutorial to get the readings accurate to two decimal places on X Y & Z. Next got the extruder calibrated to as close to spot-on as one can get with an ink mark on the filament.
So, I wanted to give it a try and now, am just dejected. I downloaded a little reprap logo .stl file and ran it through slic3r. No errors, so thought i was good to go. I opened Pronterface and loaded the g-code file and clicked Print. I saw some stuff go by in the status window, and the heater goes up to temp, but nothing happens.
Not a twitch. If I pause the print and try to do anything else with the the interface, it just freezes up and Win says “not responding” and I have to close/restart it.
I’m at a loss for real now. Pronterface just keeps repeating the temperature reading
T:182.69 E:0 B:0.0
T:182.79 E:0 B:0.0
T:183.10 E:0 B:0.0
T:184.23 E:0 B:0.0
at the bottom, it says Hotend: 190.58 E:0 Bed:0.0 printing:0.25%| Line #19 of 7744 lines | Est: 15:48:2
The last number keeps incrementing which implies it’s stalled, but not even a hint why Been looking at it and searching the Internet for the last three hours. Getting absolutely nowhere. *sheesh*
Too frustrated to look at this stupid thing anymore.
– k –
There was not a problem from what I can tell, it looks like the firmware is waiting to get up to the pre-set nozzle temperature and then also wait until the temperature becomes stable enough to start printing.
You can compile G-code without setting temperature while preferring to set your own temperature to what you want through Pronterface. Doing this will allow printing to start immediately. Just pre-heat the nozzle before you start the print. Putting a check in the box at the top of the screen will activate the temperature graph so you can see where you are at before attempting to print.
If I remember correctly, Pronterface does not respond to other commands until printing actually starts. It’s not unusual to be waiting a long time for printing to start when pre-set temperatures are used in G-code. For those that are not used to it, could be lead to think there is an error.
You can do your own pre-print test by extruding some plastic from the nozzle to make sure it’s primed and ready to go. Do the axis home routine, and checking nozzle distance from bed after Z travel to zero.
My routine before printing is to home all axis, switch on the heated build platform and get the nozzle up to temperature. I give the glass bed a wipe with acetone and then when the nozzle is at temperature, I extrude some filament to get the nozzle up to pressure and the press the home key and finally the print key. I give the nozzle a couple of wipes while the axis moves in to position.
“and checking nozzle distance from bed after Z travel to zero.”
Here’s something I don’t know how to do. How do you set the “Z travel to zero”?
I’ve been manually setting the bed per Richard’s direction; turn it all off, move bed to 0.01mm below nozzle (using a piece of paper), then turn back on, home X & Y, then print
Seems kludgey
I appreciate the detail on your startup procedure. Yesterday (last night for you), I had a very long exchange with Richard trying to get it working. He told me that it was waiting for the bed to heat up; I don’t have a heated bed, so it was going to be a long wait.
Anyway, he sent me a g-code file of your herringbone gear and it is printing right now. It seems I had the Z axis backward and some other things wrong
My first attempts today kept popping off the bed after the first few layers. So, I used a blow-dryer to heat the bed up to 50C and restarted. As I type, the process is just past the half-way point. It looks like a gear, but it’s really ‘raggedy’, so I expect there is probably some fine-tuning that I need to do.
Problem is, I have no idea at this time what that would be.
If you drop a note to my email, I can send you a picture of the result. should be done in about 20 minutes or so. Also, if you prefer, we could continue the conversation there instead of cluttering up your blog.
– k –