3D Printer Filament & Slicer Profile Handling and Tracking
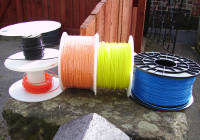
After owning and using a 3d printer for more than a couple of years, you now might have a collection of filament of different types, colours and suppliers. You will have notice that, even if you only use one type of filament,such PLA, the same g-code file does not always transfer reliably to another similar reel of filament. So, after calibrating a new reel of filament, how do you keep track of filament with associated g-code?


Recent Comments