 Airtripper’s Bowden Extruder V3 for 3d printer is now available. Please make the jump for details to:
Airtripper’s Bowden Extruder V3
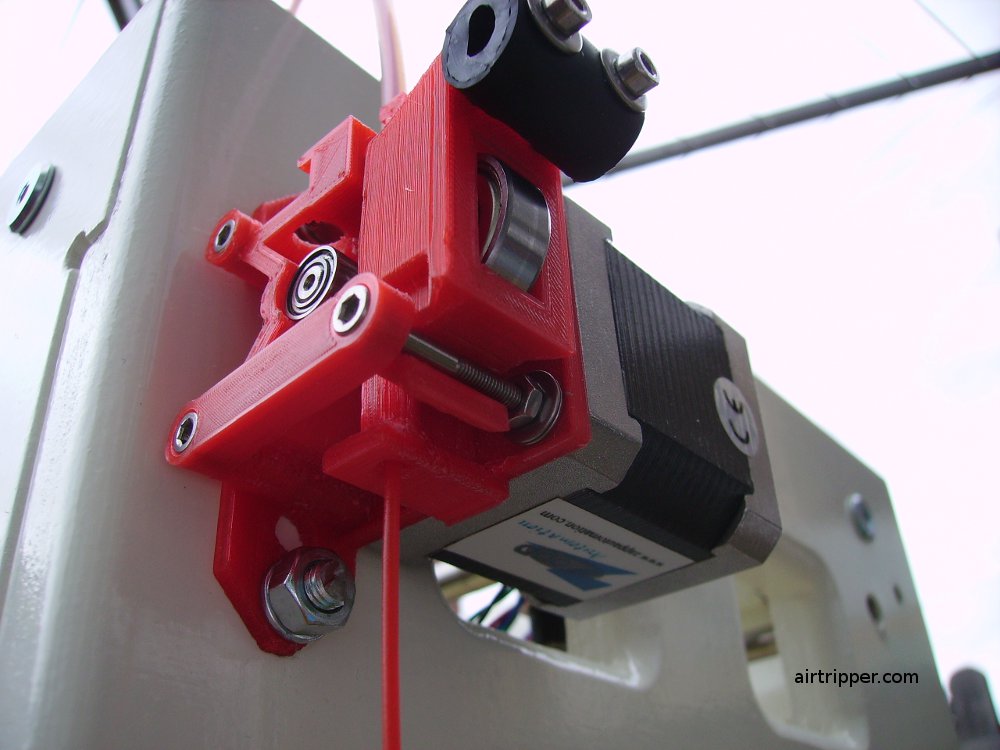
The new 3D printer 1.75mm filament extruder upgrade is now complete, all the tweaks mentioned in the Extruder Upgrade Part Two are now built in to the unit, plus extra improvements was made to the overall design, including a newly designed idler to accept the cheaper 608 ZZ Skate Bearing to simplify assembly and to keep the overall cost down. All the project files are now on Thingiverse, STL files and the OpenSCAD 3D script file. Check out the rest of this post for bill of materials, printing and assembly tips.
This 3D printer extruder is design to fit the SUMPOD 3D printer without further modification which makes it an ideal upgrade for SUMPOD users. However, due to it’s simple fixing bracket and bowden feed, the extruder can be easily added to the other 3D printer designs.
3D Printer 1.75mm Filament Extruder
The extruder, because of it’s compact size, is an ideal solution for multi-coloured printing, and also ideal for multi-nozzle 3D printers.
Rubber Pinch Roller
I’ve been testing a rubber pinch roller idler for a while now, and after close inspection of the roller, I can’t see any damage or deformation in the rubber. In my opinion, the rubber pinch roller has performed very well and performed at least as good as a bare ball bearing. However, I’m not going to recommend it for this extruder because I can’t yet provide details that proves it offers better performance than a bare ball bearing idler. For the extra cost to implement it, some proof of superior performance over ball bearing is necessary before recommending it. You will find more details and pictures about the rubber pinch roller in Extruder Upgrade Part 2.
Sumpod 3D Printer Extruder Upgrade
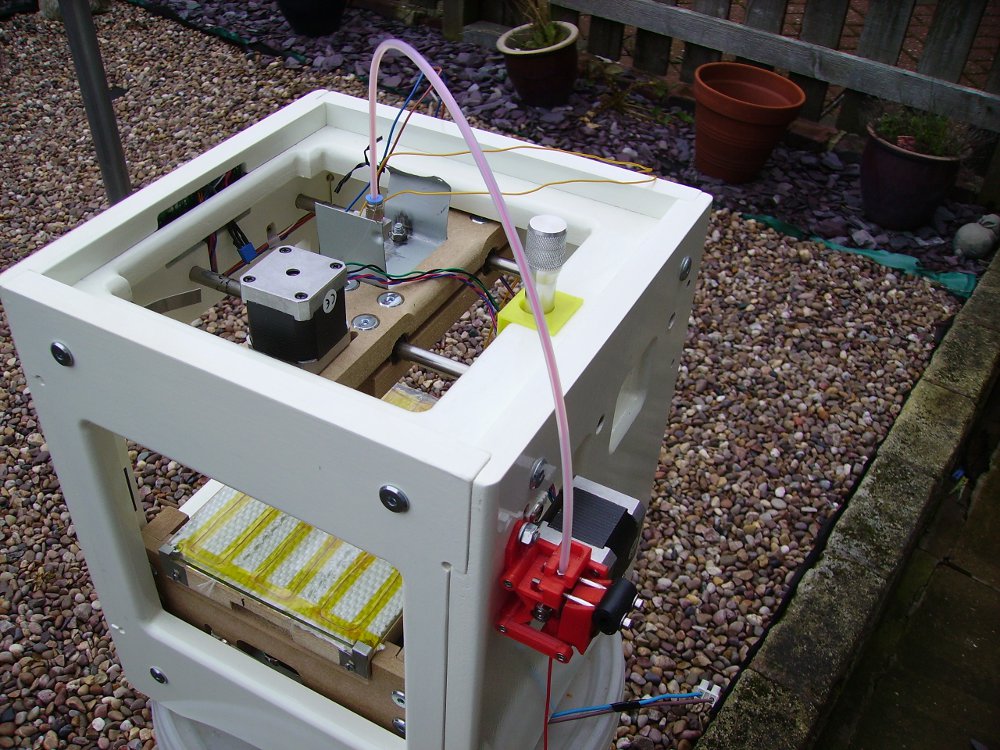
SUMPOD 3D Prototyping Printer – View from Rear
I’m recommending this 3D printer extruder as a replacement for the original SUMPOD extruder for the benefits including the following:
- The filament is pushed over a ball bearing instead of a plunger, reducing friction.
- Filament is guided through the extruder mechanism without needing to disassembling the extruder.
- A lot quicker and easier to change filament.
- It’s open and accessible design makes it easier to trouble shoot, and to visually detect signs of filament slippage.
- Easy to mount on the SUMPOD using the original extruder mount points with M6 nuts and bolts.
- The new extruder is much lighter and a lot more compact making the SUMPOD more evenly weighted.
- Improves the overall look of the SUMPOD.
- Easy to attach a second extruder for dual nozzle set up and multi coloured printing.
- Option to add a shaft ball bearing that may extend the life of the stepper motor by reducing the load on the internal stepper motor bearings.
Printing The Parts
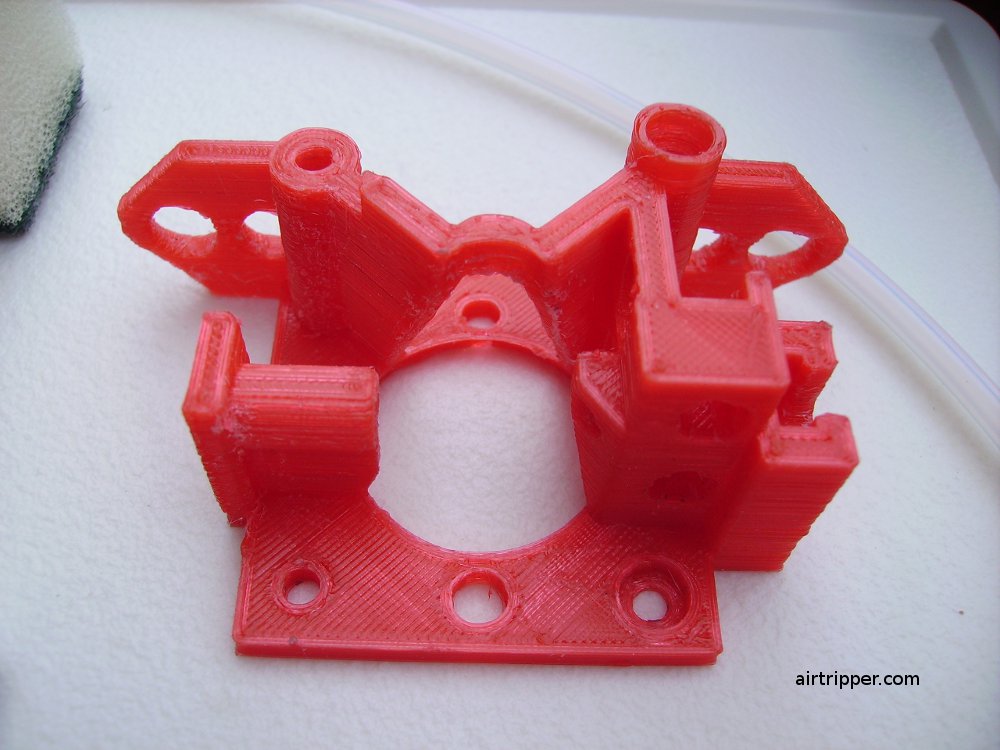 3D Printer Extruder Body, printed at 0.2mm layer height. |
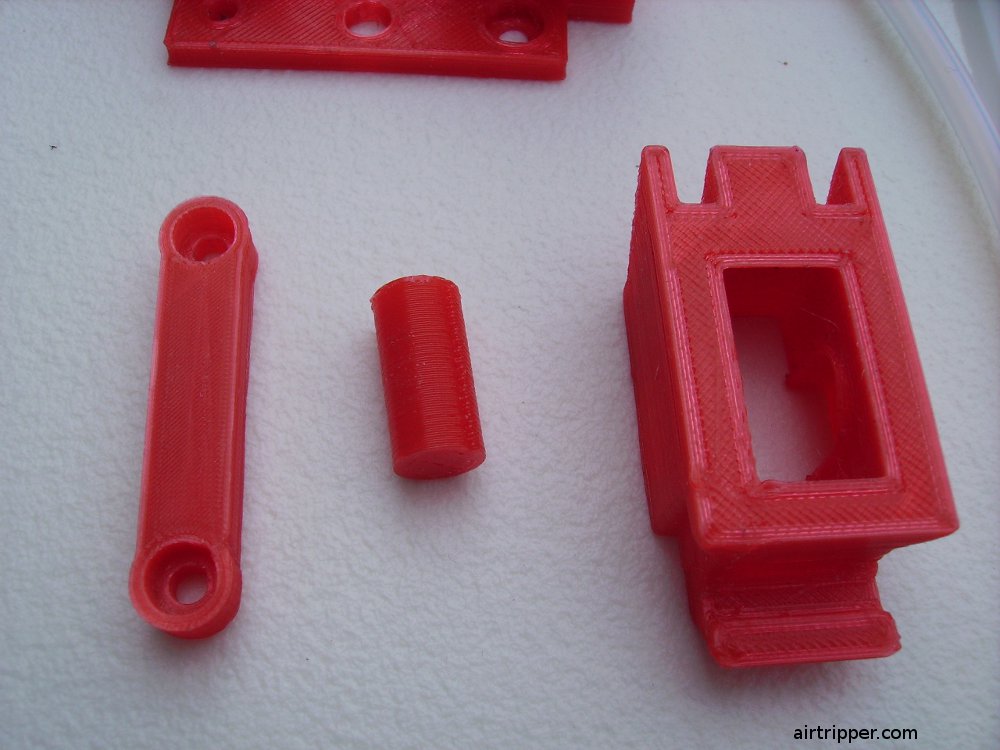 3D Printer Extruder Printed Parts – Idler Body, Strut and 8mm Ball Bearing Shaft. |
Well, there are four items to print, the main body, a support strut, idler housing and an 8mm ball bearing shaft. There will be an STL file for each item so that they can be printed separately, this will produce cleaner parts, especially if you have a bit of trouble with oozing and stringing. For the ball bearing support to be properly aligned with the stepper motor shaft bearing, the 3d printer build platform needs to be as level as it can be for printing the main extruder body.
All the printed parts were printed slowly with a fast travel feed rate with the layer height set to 0.2mm, this helped to reduce the working pressure in the nozzle which made cleaner prints, stringing and oozing kept to a minimum. For these 3d prints I used Skeinforge and Pronterface, and for the 3d printer firmware, Marlin Ver. 1 RC2.
Bill of Materials
All the parts are available from Ebay apart from the brass gear insert, if you are a SUMPOD owner, then you will have the brass gear insert already. The small shaft support ball bearing (MR105 ZZ) is optional but may improve the life of the stepper motor if fitted, also the M3 6mm screw is also optional since three screws is enough to attach the stepper motor to the extruder base. SUMPOD users require two M6 30mm screws to attach the extruder to the 3D printer, longer screws provided with the printer could be cut down to fit.
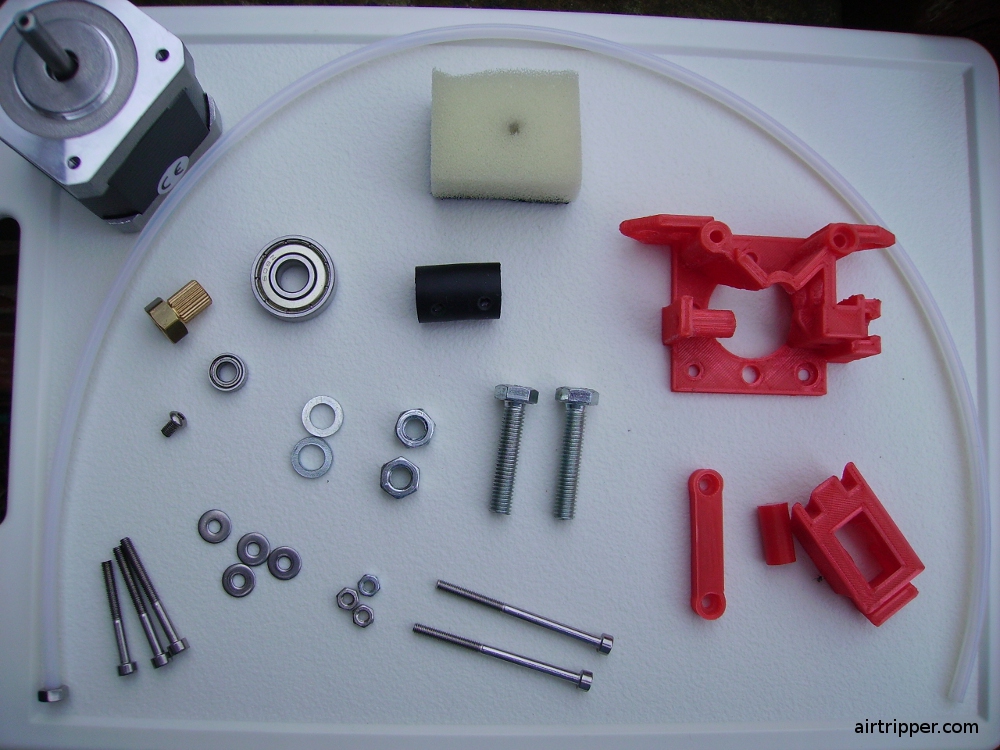
1.75mm 3D Printer Extruder Parts
The extruder requires M3 Allen Bolt Cap screws, three of 30mm and two of 45mm, these come with a smooth shaft and a limited amount of threaded shaft. To reduce cost, and you have a Dremel and eye protection, you can purchase all M3 screws at 45mm length, then cut three of them down to 34mm length (not including the cap) and fit them with M3 washers so that the caps don’t sink into the cap recess on the extruder body. Please note that the M3 45mm screws have been sized to fit the idler that is preloaded with 6mm i.d. diesel hose. You could use springs instead of diesel hose, in which case, you’ll need to size the M3 screws to fit accordingly.
Part sources and price is provided as a guide only and I’m not affiliated with any supplier on this post. Shopping around should help to reduce overall cost.
Full BoM List
- 1 X MR105 ZZ Model Miniature Ball Bearing 5X10X4 – Ebay
- 1 X 1/4″ 6mm id Rubber Diesel Hose Tubing Line – Ebay
- 1 X 5mm Plain Insert – Maritime Models – 1.80 + p&p
- 3 X M3 x 30 S/S Allen Bolt Cap Screw – Ebay
- 2 X M3 x 45 S/S Allen Bolt Cap Screw – Ebay
- 3 X M3 Stainless Hex Full Nuts – Ebay
- 3 X M3 washers – Ebay
- 1 X PTFE Tube 2X4mm – Ebay
- 1 X M4 Stainless Hex Full Nuts – Ebay
- 2 X M6 30mm Stainless Hex Head Bolts – Ebay
- 2 X M6 S/S Flat Form B Washers – Ebay
- 2 X M6 S/S Hex Full Nuts – Ebay
- 1 X 608 ZZ [8 x 22 x 7] Roller Skate Ball Bearings – Ebay
- 1 X M3 x 6 Stainless Button Head Allen Bolts – Ebay
- Files for 3d printable parts – Thingiverse
3D Printer Extruder Assembly
Some basic tools are required to complete the 3d printer extruder including, a file, drill bits to clean out the screw holes, and allen keys to assemble the extruder. Pliers may be required to grip the drill bits when reaming screw holes, and also to hold nuts while tightening screws and threading PTFE tube. The drill bits are used by hand for reaming so no power drill is required. Pictures are provided below to help with extruder assembly.
When preparing the PTFE tube to accept the M4 nut, file a taper around the end of the tube to make it easier to screw the nut on. Twist the nut back and forth a few times to get a good thread on the tube, and with the nut in place, used a 2mm drill bit to restore the tube’s inner diameter if necessary. Fit the nut, with the tube connected, in to the slot on top of the extruder and screw the tube one turn in to the nut to lock in place after testing for hole alignment with a piece of filament.
To prepare the idler preloader, cut a piece of diesel hose tubing to about 22mm long, then make two holes about 12mm apart for the M3 screws to go through. You can make the holes by pushing a thin shafted plus head screw driver through the rubber, and then move a drill bit back and forth to open up the holes enough to push the M3 45mm screws through. You may have to use pliers to hold the drill bit. Refer to the pictures below for further assembly details.
[bodyadsrich1l]
 3D Printer Extruder Base and Stepper Motor Assembly |
 3D Printer Extruder Strut Assembly |
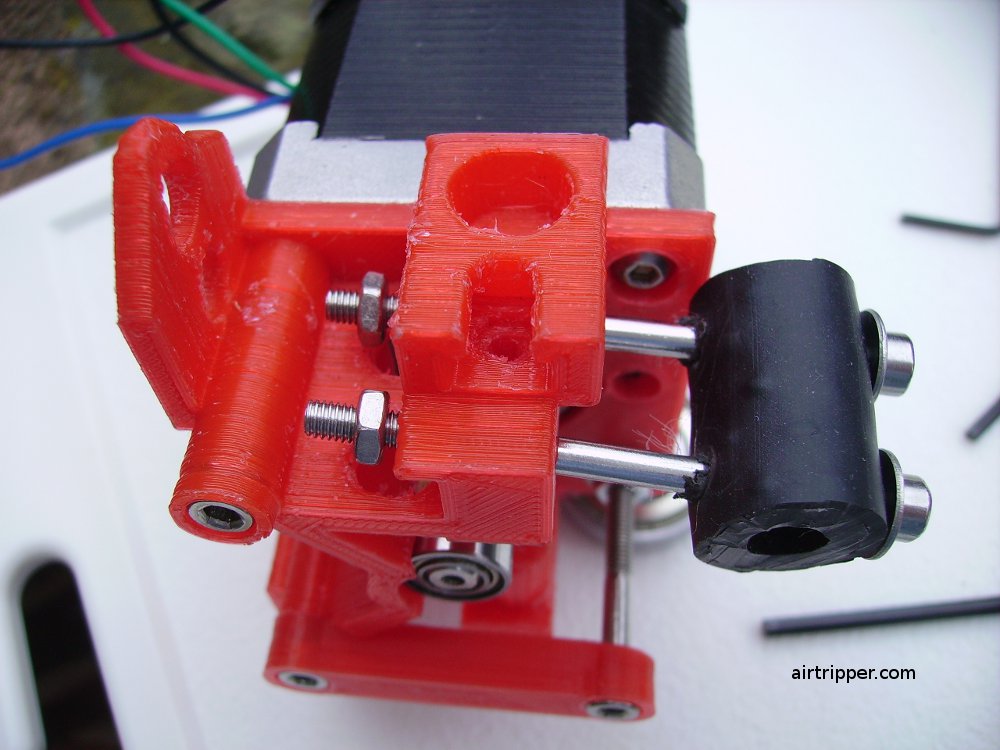 3D Printer Extruder Idler Preloader Assembly |
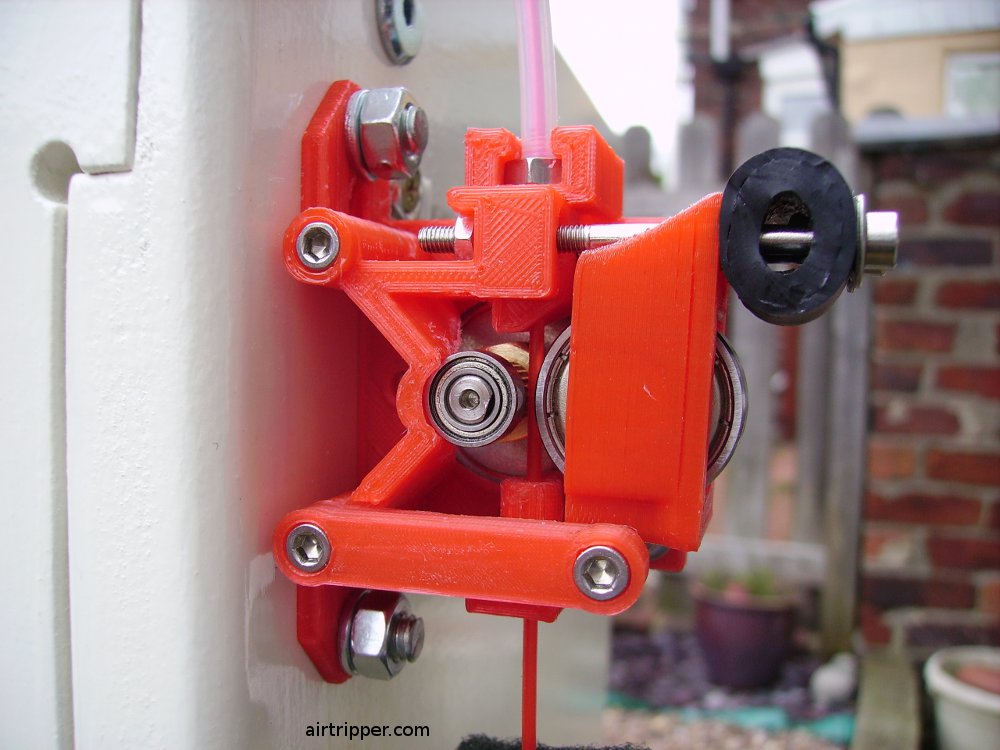
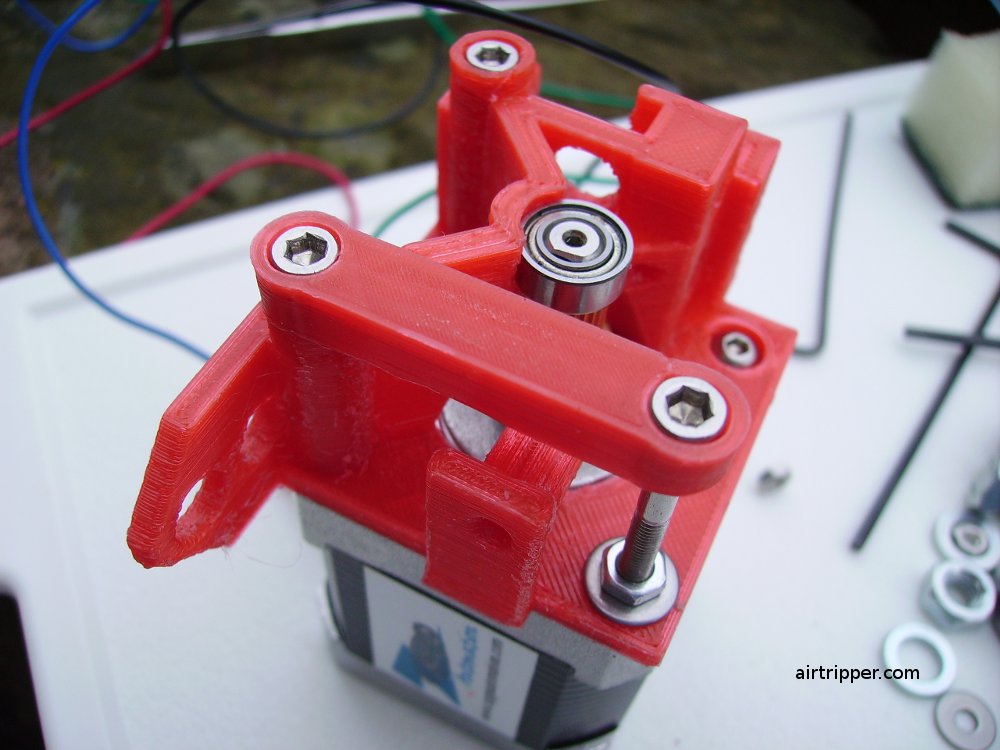
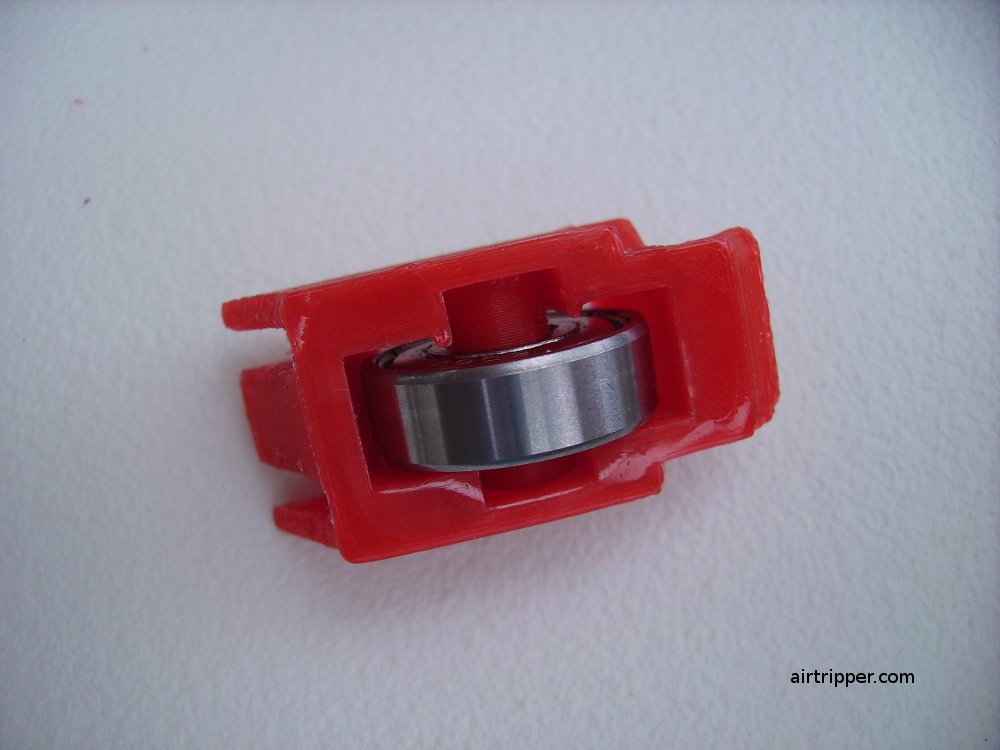 3D Printer Extruder 608ZZ Ball Bearing Idler |
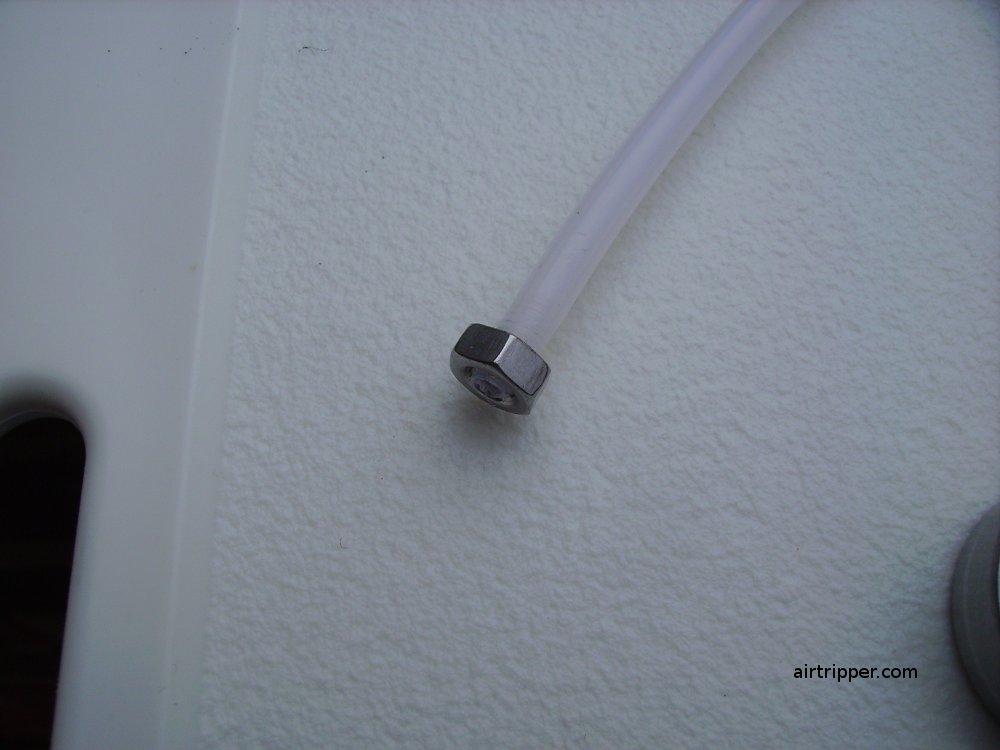 3D Printer Extruder Bowden Tube Cable with Nut |
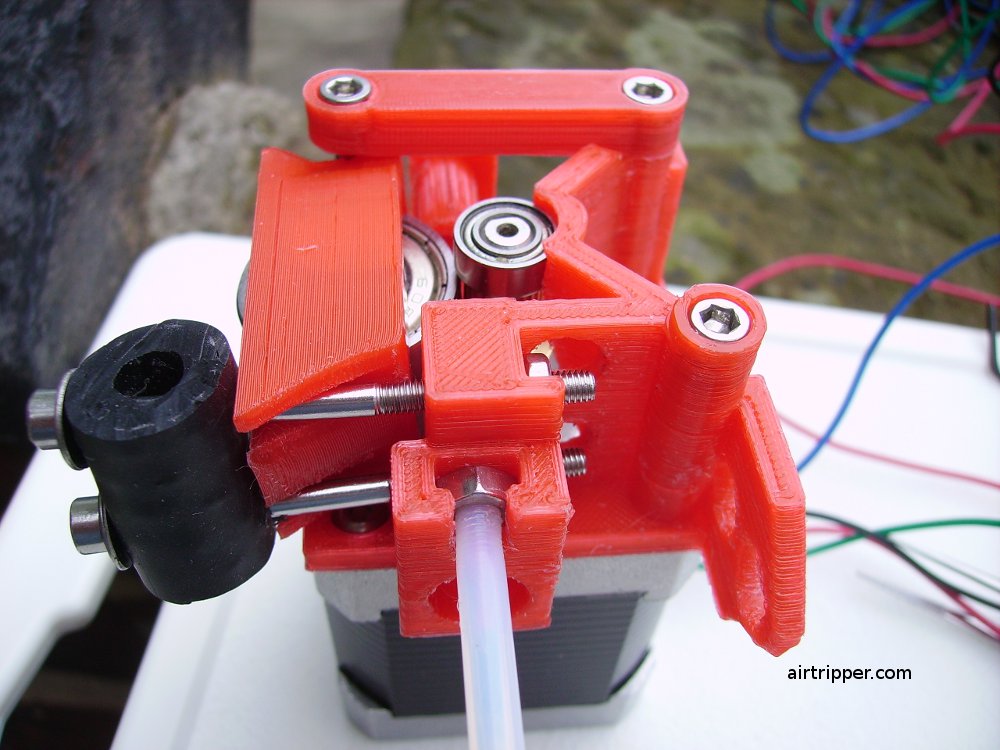 3D Printer Extruder and Stepper Motor Assembled |

excellent design. Looks good.
Mark, when I try to print the idler body, the corners of the thing are all ‘floppy’ while it is being printed, so it ends up with small horns in the corners. Are you using a fan to blow air across the workpiece?
I’m printing the extruder at 12mm p/s with a 60 second cool setting so that each layer takes at least 60 seconds to print, this is to allow each layer to cool before the next layer is added. Also, the layer height for this print I have it set to 0.2mm with fill at 100 percent, other settings may not fill the idler horns correctly causing them not to form correctly when printed. If the settings used are similar to mine, the print time should be about 2 hours 10 minutes.
If you are still having problems let me know and I will make the horns a bit thicker. I’ve uploaded a new idler STL file which adds a flange around the print to reduce warping.
Mark
Hi Mark,
thanks for the info. I will try again with your settings above, and I will download new STL file.
This may seem a silly question, but I’m floundering a bit here; the 12mm/s mentioned above is in Skeinforge\speed\Feed rate or Replicatorg\XY feedrate?
Thanks again
William
Yeah, I set the Skeinforge/Speed feed rate and flow rate to 12mm/s. I usually use Skeinforge to get the g-code and then load that g-code into ReplicatorG or Pronterface for printing.
Mark
Hi – Did you have fan cooling when printing this? Every time I try to print the shaft, I get a mess of molten plastic. I’ve tried the 60s cooling, but because the head is still touching the plastic it keeps melting. If I enable orbit, there seems to be a bug where it releases control of the stepper and slips a few mm in the Y axis
Everything else has printed to some degree of success!
Rich.
I think the 3d print works for me because the nozzle I’m using is pointed rather than flat like the original SUMPOD nozzle. You could use Skeinforge/Multiply to print two at once, making the nozzle change between the two after each layer, giving each layer time to cool before the nozzle returns to complete the next layer.
My SUMPOD firmware stepper calibration is:
DEFAULT_AXIS_STEPS_PER_UNIT {106.76, 106.76, 800, 67.16}
These are what I calibrated myself.
You could also increase the print speed by reducing the cool time, by half since printing two, so that the nozzle does not spend too much time over the print.
Printing the extruder parts do need a good set up to print well and different filament gives different results.
Mark
Hi Mark,
I made the extruder and it works well.
But now I’m suffering from the dreaded PLA jamming, so I’m looking at the potential hot end problems. I notice you are using a different hot end. What is it and what are the advantages?
Regards
William
I’m using a hot end similar to the Mendal Parts V9 Hot End, the heat sink plate and fan are required to make it work with 1.7mm PLA when extruding at higher temperatures.
My extruder setup keeps the filament as cool and as stiff as possible until it reaches the melt chamber, this avoids jamming due to filament getting too warm at the cold end and buckling under extruder pushing force.
I have filament that needs around 220 degrees C to extrude and would not work with the sumpod extruders because the PTFE tube got too hot causing the filament to swell before it reached the melt chamber leading to jamming.
If you are using the sumpod nozzle with the peek insulator, I would recommend heat sinking the peek insulator to draw heat off to prevent the PTFE tube from getting too hot.
This is a youtube clip that shows a similar hot end that I’m using in detail: http://youtu.be/sR9l5O69MCM
Mark
I followed your original BOM and am going to be using the 5mm plain insert [model boat gear] for the extruder. Have you had problems with filament stripping because of the fine teeth? I read somewhere you or ??? suggested a more aggressive tooth or to hob the gear? What is your status with this?
I’m still using the plain insert gear at the moment because I’ve been able to get it to work due to the improvements I’ve made to the hot end. As long as the hot end can extrude PLA filament at a wide range of temperatures without jamming, then the plain insert can be made to work. For example, I’m using PLA that extrudes best at 220c and some PLA extudes best at 190c, and because I have active cold end cooling, there is no filament jamming or swelling before the melt chamber, even at higher temperatures.
I’ve not used ABS filament so I can’t advise on that in case that’s what you are using. If you have a hot end nozzle that works well with 1.75mm PLA then the plain insert is worth the try.
Hi Mark,
I’m first time builder of RepRap machine and would like to buy your design extruder or just printed parts for it. Please, let me how it’s possible to do.
Regards
Andrey
I can print a set of extruder parts.
I’ll get the 3D printer to print a full set of extruder parts in the next day or two, then I will contact you by email.
Most likely you will have to get the bearing, plain insert gear and tube yourself. The screws and the piece of Rubber Diesel Hose Tubing I’ll include.
Mark
I noticed in one of your pictures that the Maritime drive gear allows the extruder to provide a straight path for the filament right through to the Bowden tube. I’ve assembled your extruder using a MK7 drive year. The MK7 gear forces the filament to bow somewhat around the drive gear. I have not fully assembled my Rostock yet so I’m uncertain if this will pose a problem. Any thoughts regarding this?
I don’t have a MK7 drive gear type to see how much the filament bends round. However, I uploaded a modified version of the 3d printer extruder to give the filament an easier path around the larger extruder drive gears to reduce friction.
The larger 3d printer extruder drive gears will have a better grip on the filament because the filament slightly wraps round the gear. Having a straight path just makes it easier to feed new filament into the extruder.
As long as you’re using 1.75mm filament and and the filament is not the very brittle kind then your 3d printer extruder should work great.
All the best with your Rostock,
Mark